A simple and multifunctional strategy that work is based on a Fibonacci grid. Fully automated for working on the "Aftershock" strategy. Buys at the fibo levels and then sales at higher ones. Its multifunctionality provides different ways to use the strategy.
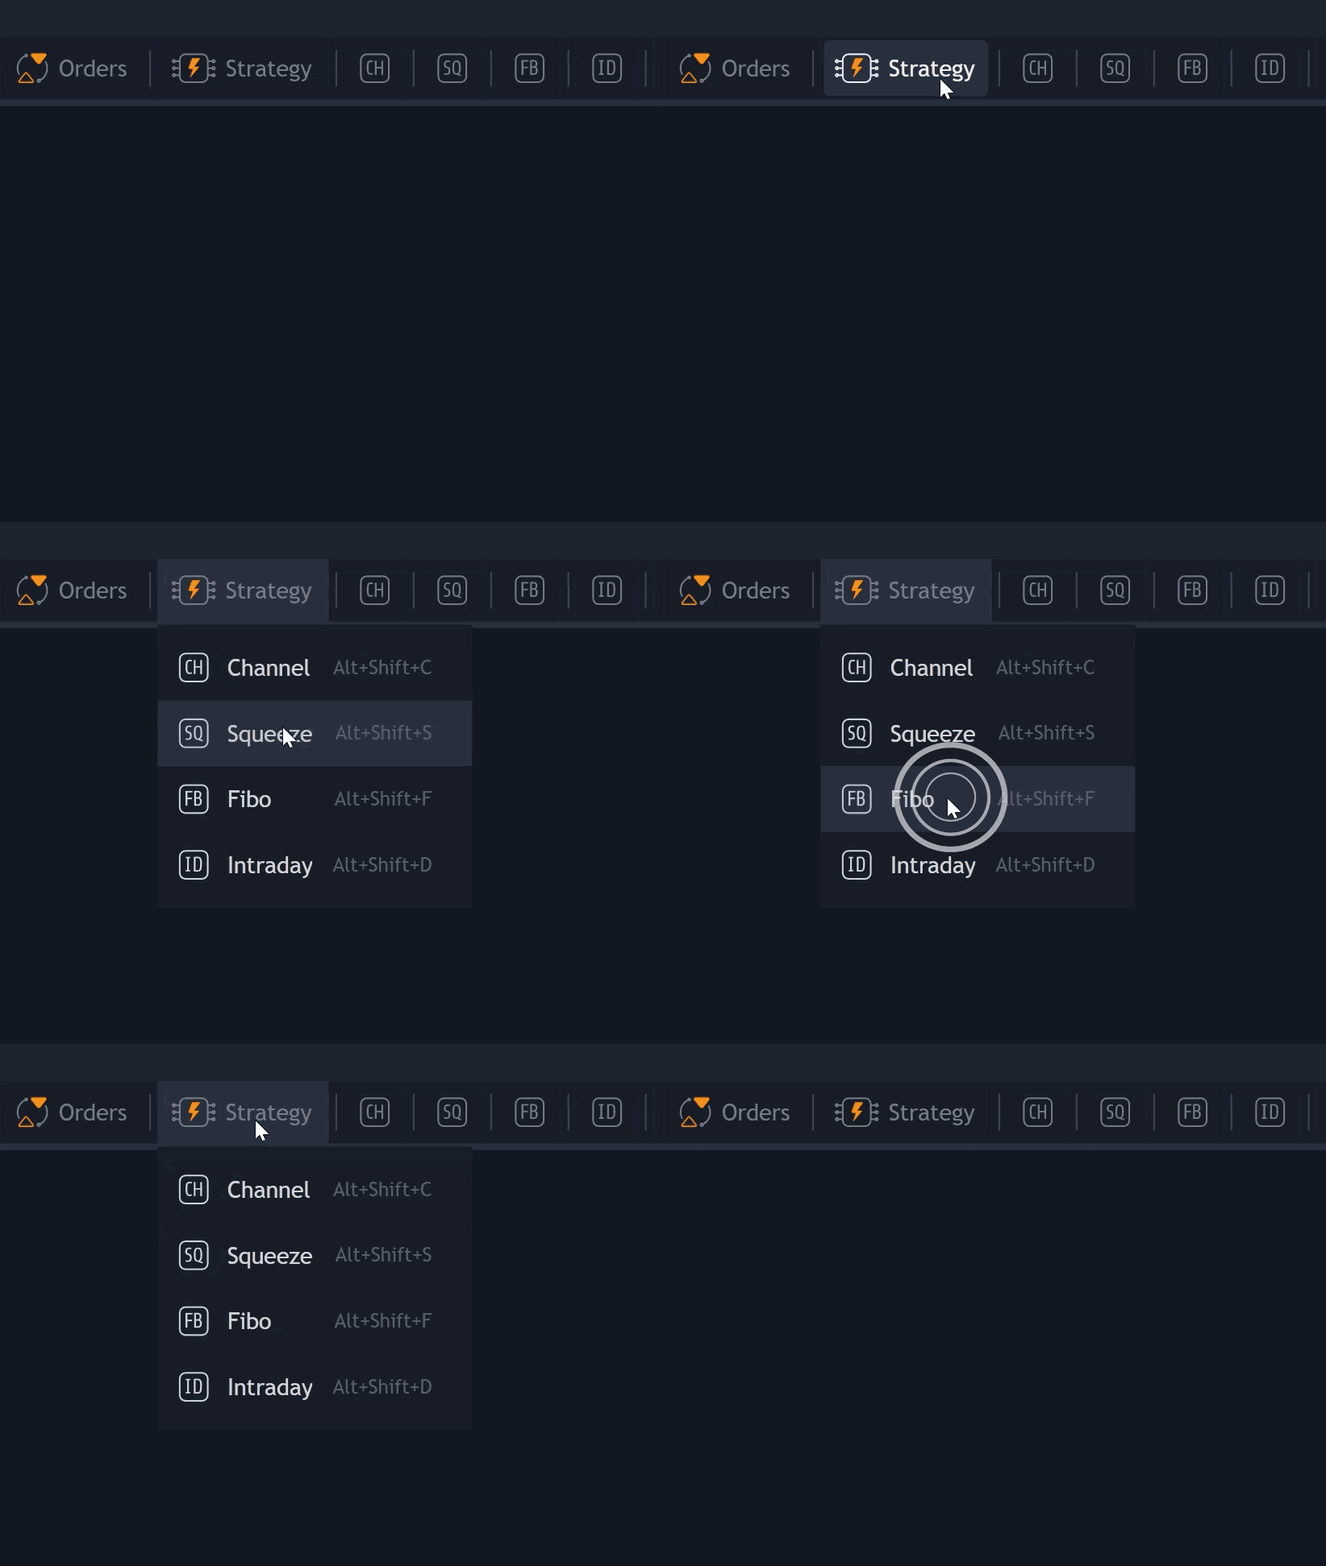
- Open the "Strategy" menu on the chart.
- Click the "Fibo" tab.

- A fibo grid shows up linked to the candlesticks visible on the chart (see the image below). Then adjust it on the chart.
- Create a "Fibo grid" on the chart by the "Fib retracement" tool.
- Open the strategy creation window by selecting the "FB" icon on the panel of favorite strategies (1), or by right-clicking on the tool and choosing "Launch Strategy" from the context menu (2):

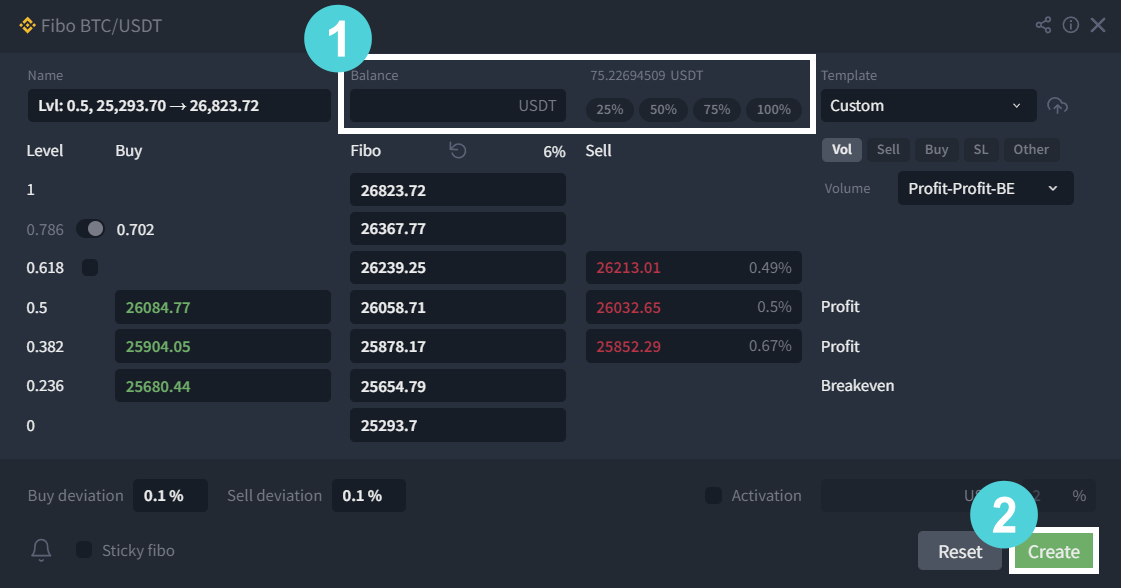
- Enter the volume in numbers or percentage (1) and click ''Create'' (2):


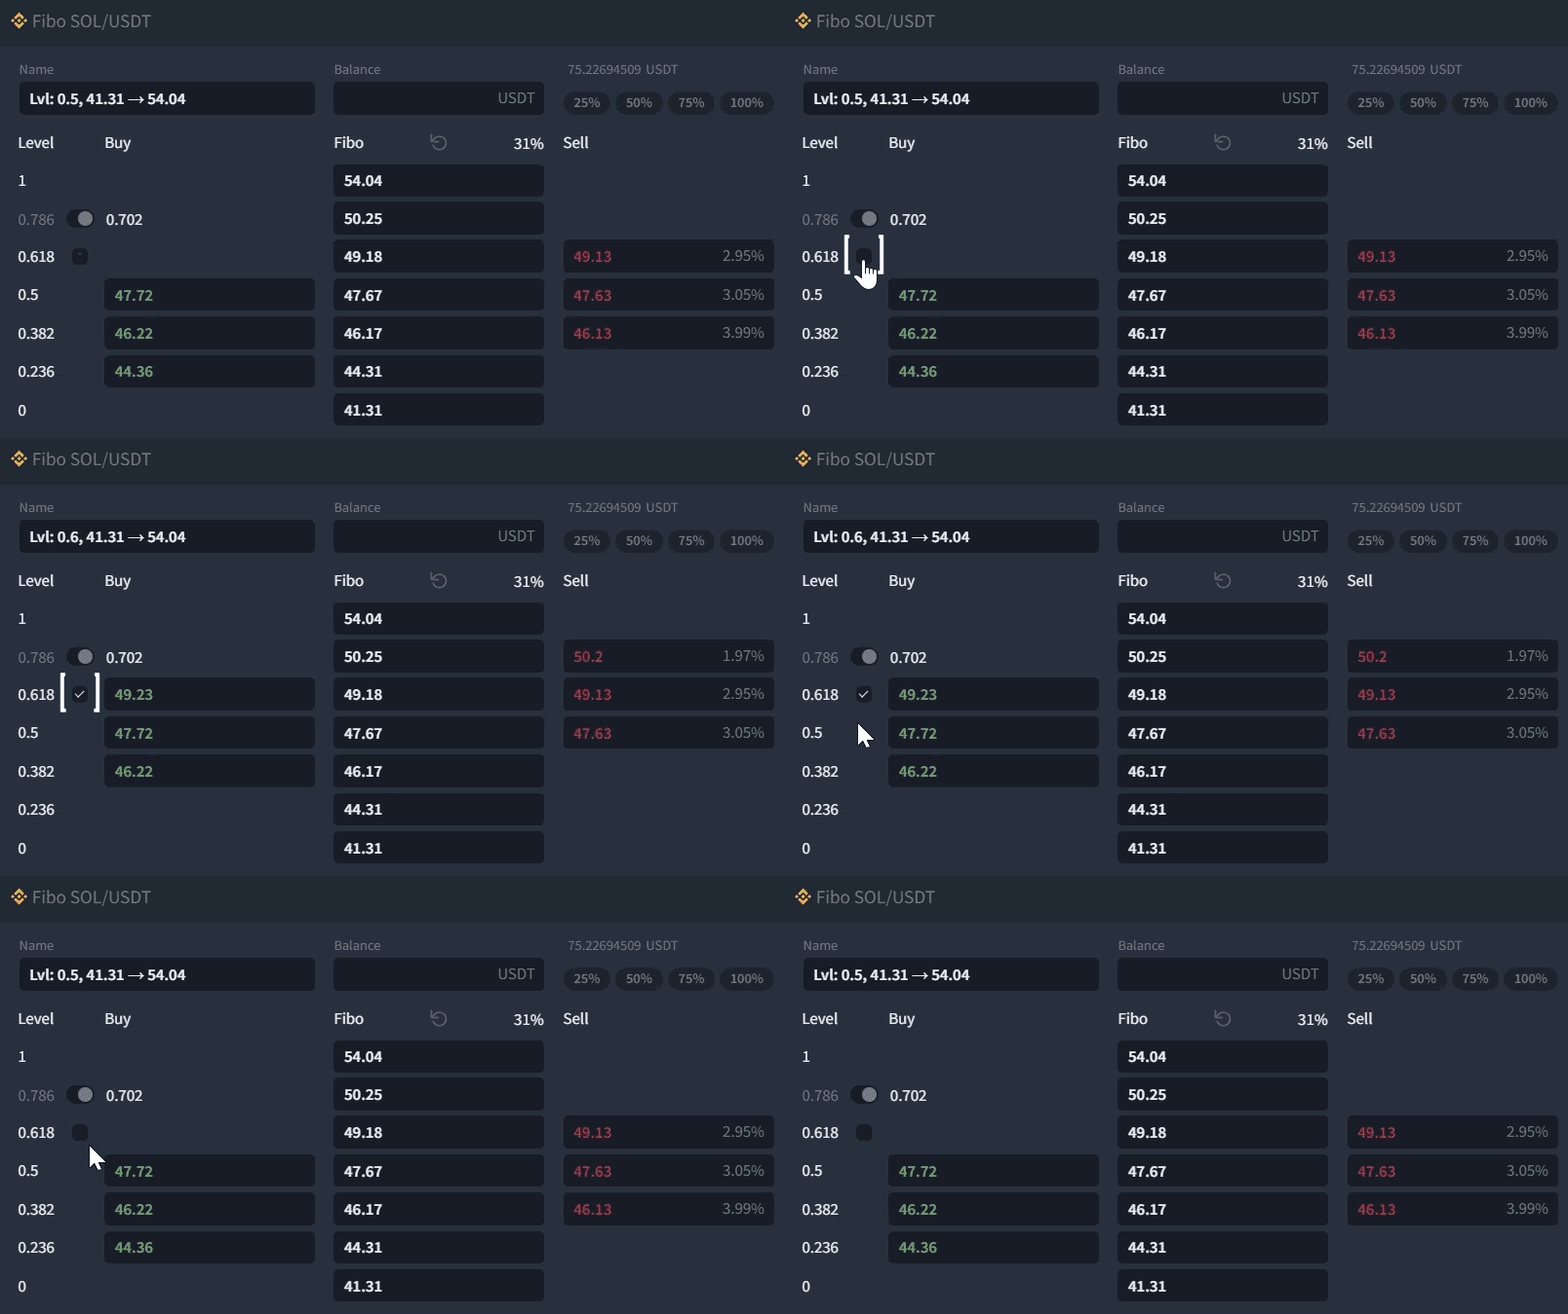
- When the price touches the 0.5 level, the strategy buys and automatically places a sale order at the 0.618 level.
- If the strategy buys at the levels of 0.5 and 0.382, then it rearranges the sell order (at the 0.618 level) and places a new sell order at the 0.5 level (i.e. one purchase is breakeven, the second with a profit).
- If the strategy executes all three orders, the strategy automatically places all purchased values at the level of 0.382.


The user can automatically place the highest sell order in the middle of the channel (0.786-0.618) by switching the toggle from "0.786" to the "0.702" position. The positions of these toggles and checkboxes, as well as the values in the "buy/sell deviation" and "% of the start trigger" boxes are saved for the next start.
2. Deviation of buy and sell orders from the Fibo grid levels
Usually, Fibo grid levels often coincide with liquidity zones. Therefore, it is recommended to set deviations from the levels in the strategy to prevent situations where buy or sell orders are within or beyond a cluster of orders, reducing the chance of a profit.
The values in these fields stay for the subsequent launches.
3. Enabling the activation trigger for the strategy.
Allows users to set up strategy activation when the price reaches a certain percentage delta, up to the first (upper) strategy order. Until this moment, Fibo is in waiting mode and doesn't reserve the allocated balance.
The values in these fields are saved for subsequent launches.
4. "Sticky fibo" checkbox
6. Tabs to configure Buy an Sell orders, Stop loss, and other
- Limit
- Grid
- Iceberg
- Market (for stop loss and stop loss+)

"SL" tab
In the "SL" tab, users can configure the main stop loss level for the strategy. Read the article "General settings for trading strategies" for more information.

In the "Other" tab, there is the option to specify:

- "If not activated for": stop timer for the strategy. It is applicable only to a strategy launched with an activation trigger. If the strategy is not activated within the user-defined time (since the launch or the last deactivation), it terminates itself.
- "Max price change": the strategy stop trigger on sharp price changes is used to protect against sudden price jumps when the "Sticky Fibo" parameter is enabled. The percentage change is tied to the 1-minute timeframe. When the conditions are met and this trigger is activated, the strategy forcibly stops.
- Add extra stop loss without restarting the strategy:
- In the configuration window, navigate to the "SL+" tab and click on "Add Stop Loss"; alternatively, in the additional strategy toolbar located in the list of indicators on the "Chart" block, click on the "ellipsis" to access additional parameters, then select "Add Stop Loss".
- Use the tool on the chart that appears to set the trigger level for the "stop" (horizontal or dynamic line).
- Click on the "SL" button on the top panel of the "Chart" block.
- After triggering a stop loss of any type, the strategy will terminate.

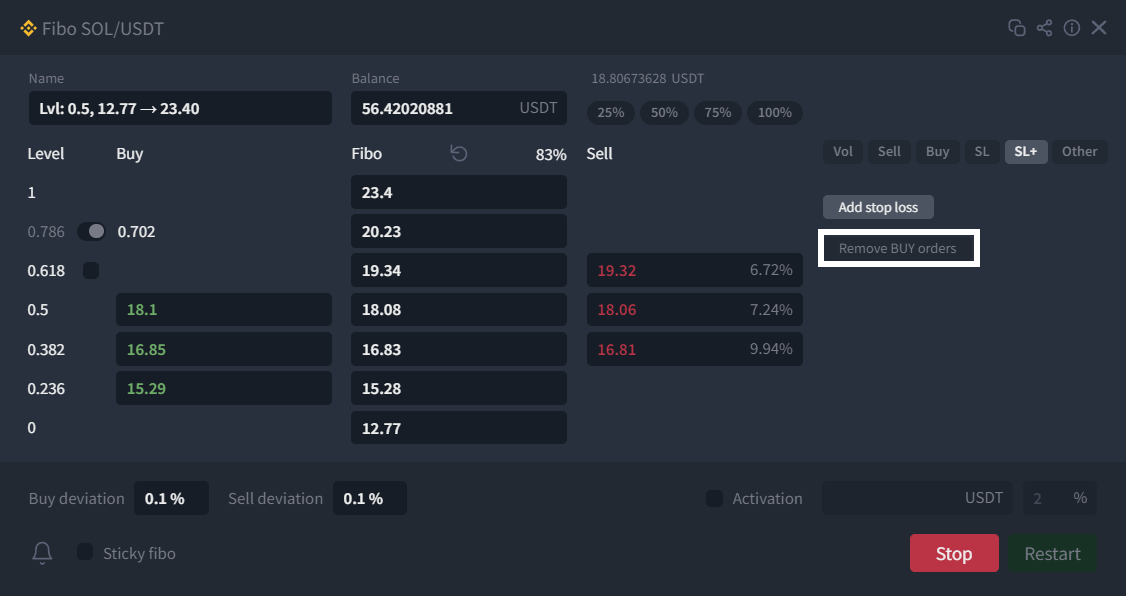
- In the "Stop Loss+" tab, the strategy has a "Remove BUY orders" option for intraday trades.
- The strategy must have an executed limit order to cancel buy orders.
- Stop loss+ must be placed.

Was this article helpful?
That’s Great!
Thank you for your feedback
Sorry! We couldn't be helpful
Thank you for your feedback
Feedback sent
We appreciate your effort and will try to fix the article